

The CERV2 is installed and ready to turn on…so now what? This guide will get you up and running so the CERV can start managing your indoor air quality right away!
This guide will provide a quick overview of the control and operation of the system. For the full touchscreen user’s guide, refer to the following document:
descriptionCERV2 Controller Guide
Turning on the CERV2
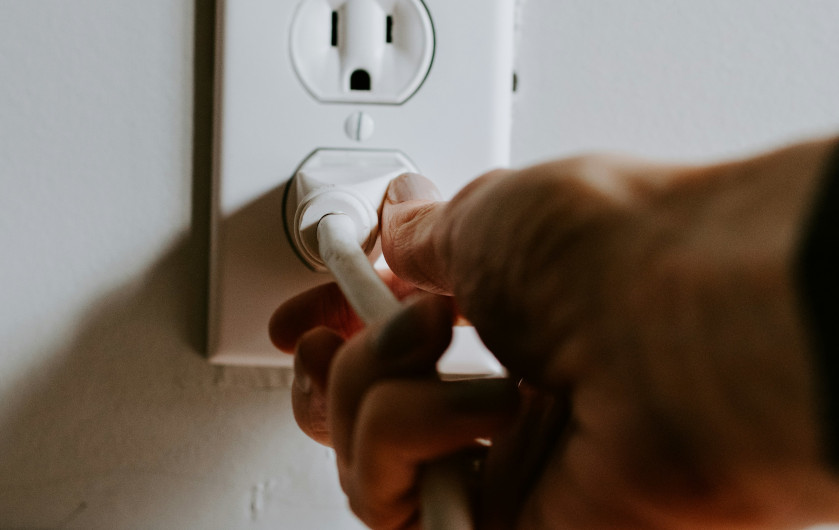
Once the CERV2 has been plugged into a wall outlet and switched on, the CERV will enter an Assess mode. In Assess mode, both the supply and exhaust fans are engaged with the internal dampers in a recirculation position. This allows the CERV2 to measure the inside and outside Temperature, Relative Humidity, and IAQ (CO2 & VOC). Assess mode generally will run for approximately 3 minutes to ensure accurate readings. During this period, you will be greeted by the following home screen, which will display the measured readings.
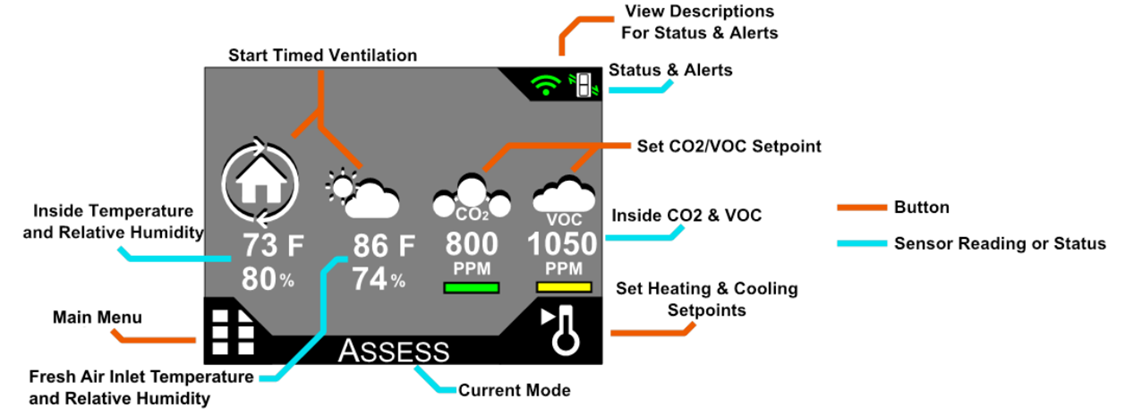
The background color of the screen, along with some of the icons will change depending on the CERV’s current operating mode. The possible modes are:
- Assess – The CERV is recirculating air throughout the house in order to obtain current readings of the home’s overall health and comfort. If the CERV is within all setpoints and does not need to ventilate, heat, or cool, it will revert to its standby “Energy Saver” mode. Assessment is 2 minutes in duration and time between assessments depends on the Assessment Interval (section below).
- Vent (Heat/Cool/Setpt) – The CERV will ventilate the home for various reasons. The CO2/VOC levels may have gone above setpoint, a wireless ventilation switch was triggered, a timed ventilation event may have been started, or the CERV may be using outside air to heat or cool the home. If the home is within the heating and cooling setpoints, but the CERV is ventilating, the screen will be green and the current Mode will show Vent Setpt. A red or blue screen will appear if the CERV is heating or cooling while in ventilation mode.
- Recirc (Heat/Cool) – If ventilation is not needed, but the inside temperature is outside the bounds of your heating or cooling setpoint, the CERV will go into a recirculation heating or cooling mode. The screen will be red or blue depending on heating or cooling mode.
- Off – The CERV has determined that your air quality is acceptable and your inside temperature is satisfactory. It will conserve energy by turning itself off. The screen will be gray while in this standby mode. The CERV fans will come on periodically for the assessment period.
Other Notes:
The colored bars below the CO2/VOC readings indicate how the current air quality levels compare to the setpoint. Green indicates that your air quality is acceptable, yellow indicates that the pollutant level is nearing the ventilation setpoint, and orange indicates that the pollutant level is above the setpoint and the CERV is ventilating or will start doing so shortly.
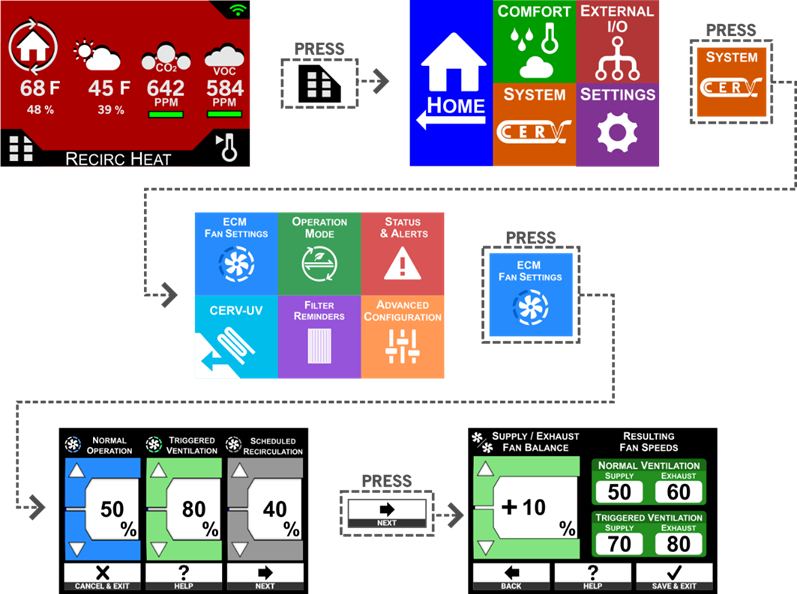
Fan Speed Configuration
The inline fans included with the CERV can be configured to help maximize comfort and fresh air delivery to the home. There are three configuration settings for the inline fans:
- Normal Operation: This will be the default fan speed for the system as it ventilates, recirculates, heats, and cools your home. In Recirculation Heating and Recirculation Cooling modes, the outside fan may increase to a higher speed to help boost the efficiency and capacity of the CERV.
- Triggered Ventilation: If a wireless switch is pressed to trigger a ventilation period, the fans will increase to the Triggered Ventilation fan speed setting. This fan speed setting also applies if you start a timed ventilation event from the wireless controller.
- Scheduled Recirculation: When no heating, cooling, or ventilation is needed, but the CERV is configured to recirculate and filter air, the inside fan will recirculate air throughout the home. This fan speed setting allows you to recirculate at a higher or lower airflow than normal operation.
The user may also specify a supply/exhaust fan balance setting for the system. If the fan balance setting is nonzero, the exhaust fan will run higher or lower than the supply fan while ventilating in order to compensate for ducting losses for balanced ventilation. For example, if the user sets a -10% fan balance, and the “Normal Operation” fan speed is 50%, if the CERV is ventilating due to VOC or CO2 levels, the supply fan to the home would run at 50%, and the exhaust would run at 40%. With a +10% fan balance, the supply would be 50% and exhaust would be 60%.
Recommended Settings
- Normal Operation: This fan setting should be chosen to achieve around 150cfm airflow to the home.
- Triggered Ventilation: If you wish to purge the home as quickly as possible, this may be set up to 100%
- Scheduled Recirculation: For those with noise sensitivities, a lower airflow for recirculation may be desired. To improve air quality and comfort mixing, a higher airflow could be selected.
- Supply/Exhaust Fan Balance: Once ductwork has been characterized, this should be configured to achieve the desired pressurization level.
Indoor Air Quality Setpoints
The CERV is a demand-controlled ventilation (DCV) system and has independent CO2 and VOC sensors. If the CO2 or VOC sensors read above their PPM (parts per million) setpoint, the CERV will go into fresh air ventilation mode to bring the air quality back to an acceptable level.
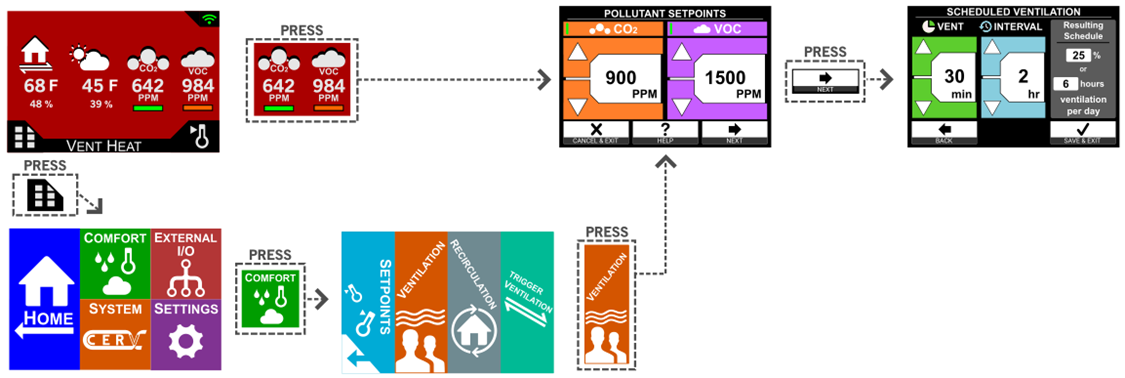
The Scheduled Ventilation screen lets you set scheduled ventilation where the CERV will ventilate for a fixed schedule regardless of CO2 and VOC sensor readings. This can be used in addition to the demand-controlled ventilation (DCV) or in place of DCV if the pollutant sensors are turned off.
Recommendations
Recommend Ventilation Setpoint is 900 to 1100PPM. Studies have shown that levels above 1000PPM can indicate that a home may have detectable odors as well as negative effects on productivity, alertness, and general comfort.
While the CO2 and VOC sensors in the CERV generally detect most air quality issues, in some cases occupants may detect odors that the system may not. As a supplement to the normal on-demand ventilation using the internal sensors, Scheduled Ventilation can be set to provide a fixed amount of fresh air regardless of the IAQ levels detected by the CERV.
Heating and Cooling Setpoints
With the CERV’s built-in heat pump, it can provide some supplemental heating and cooling in addition to its energy exchange abilities. The Heating and Cooling setpoint screen on the CERV allows you to configure how the CERV’s heat pump will operate. The path to reach this configuration screen is seen below.
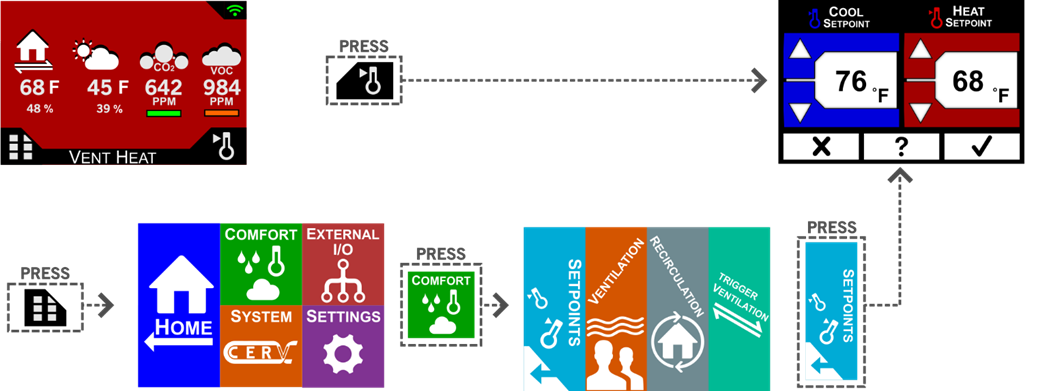
Recommendations
The heating and cooling setpoint values for the CERV2 can generally be thought of in a similar manner to the setpoints on a traditional heating or cooling system. The CERV2 uses a dual-setpoint system allowing for enhanced flexibility (especially in the swing-seasons). A typical configuration may look like the following:
- Winter: Cooling Setpoint – 80F, Heating Setpoint – 70F. The cooling setpoint is set to a value significantly larger than the heating setpoint, as you may want to prevent the CERV from going into cooling mode when it is cold outside. If the indoor temperature did go above the Cooling Setpoint when it is cold outside, the CERV would most likely go into a “Free Cooling” mode, where it would bring in outside air (with the heat pump off) to help cool the house.
- Summer: Cooling Setpoint – 74F, Heating Setpoint – 60F. Similar to Winter, the Heating Setpoint is set significantly lower than the Cooling Setpoint to prevent the CERV from going into heating mode. If it did go into heating mode with warmer outside temperatures, it would likely go into a Free Heating Mode without the heat pump engaged.
- Spring and Fall: Cooling Setpoint – 74F, Heating Setpoint – 70F. In the swing seasons, it may make sense to bring both heating and cooling setpoints closer, as there may be some days (or parts of a day) that need cooling, and some that need heating.
CERV2 Wi-Fi Setup
While the CERV2 is fully functional without an internet connection, online capabilities through the CERV-ICE app unlock important metrics, analytics, and convenience. The CERV2 comes with built-in Wi-Fi, and can be quickly configured, as shown below:
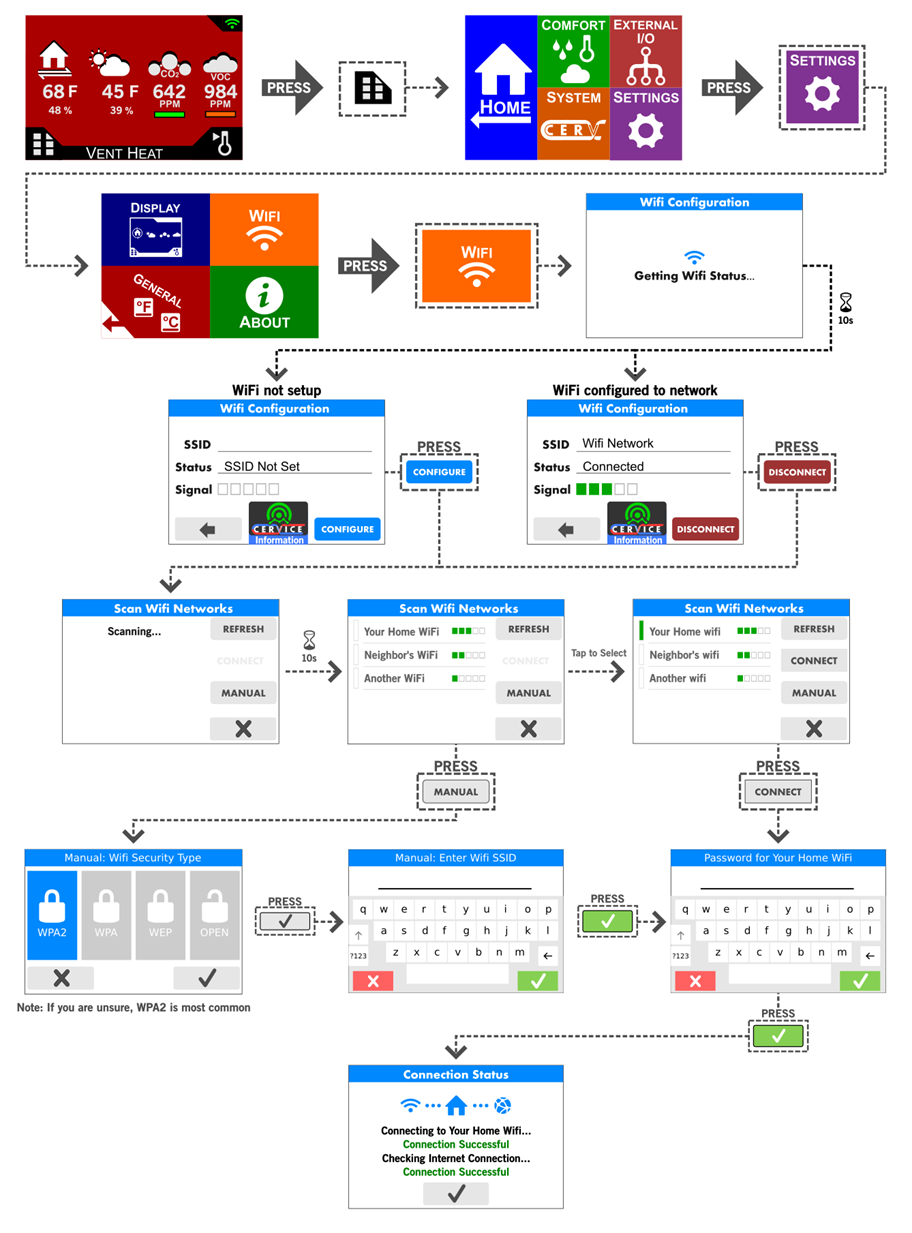
Troubleshooting and Alternative Connection Methods
As an alternate method of connecting the system online, you may use a phone or computer to configure the CERV2’s Wi-Fi. More information on that method can be found here:
descriptionCERV2 Wi-Fi and CERV-ICE Setup
The CERV2 can also utilize a standard ethernet cable for its online connection. More information for the Ethernet Module’s setup can be found here:
descriptionCERV2 Ethernet Module Setup Guide
CERV-ICE Online Control & Monitoring
A free CERV-ICE account can be created to view data and air quality analytics for your CERV2 and to control your system remotely. To create an account, navigate to /cervice/
CERV-ICE is also available as a free app in the Apple Store or Google Play. Search for CERV or click on the links below.


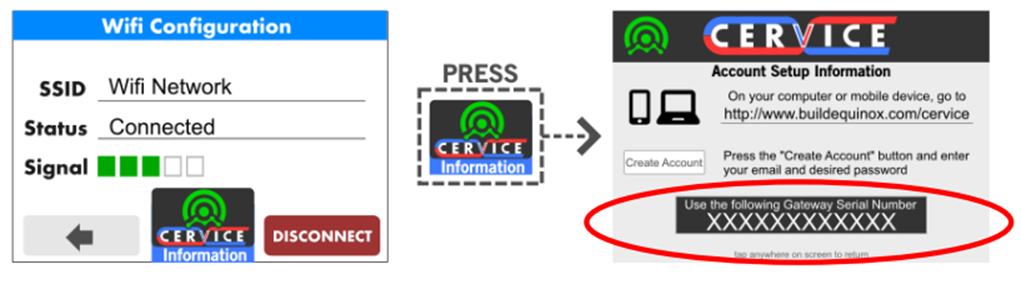
On the CERV-ICE login page or in the app click the Create Account button – the wizard will now guide you through the account setup process. Once logged into your CERV-ICE account, select your CERV model, name your device, and enter the CERV’s 12-digit “Gateway Serial Number”. The Gateway Serial Number can be found on the CERV’s Wi-Fi configuration page:
Additional Configuration
In addition to the information given in this guide, there are many other options for configuration of the system. For further details, please refer to the CERV2 Touchscreen Controller User’s Guide. The guide also documents how to add wired and wireless devices, configure zones, and much more: