

In order to ensure trouble-free operation, there are a few simple periodic maintenance tasks to perform on your CERV. This guide will take you through the process of changing filters, checking the outdoor vents, and ensuring the condensate drain remains unobstructed.
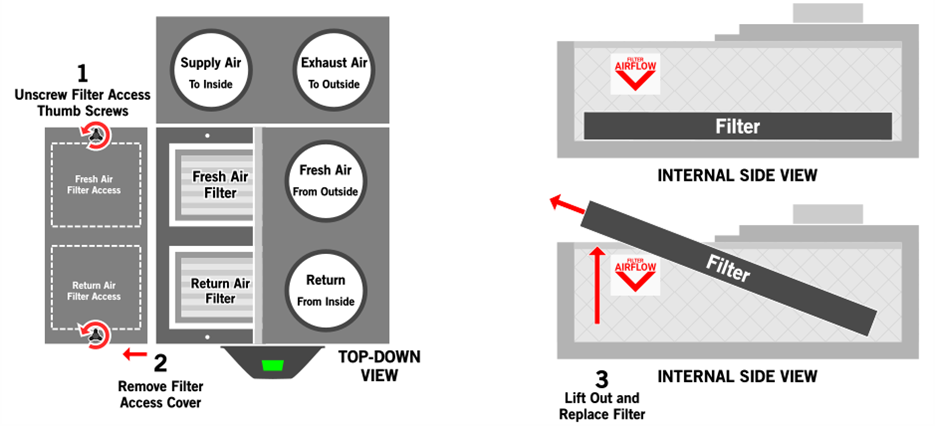
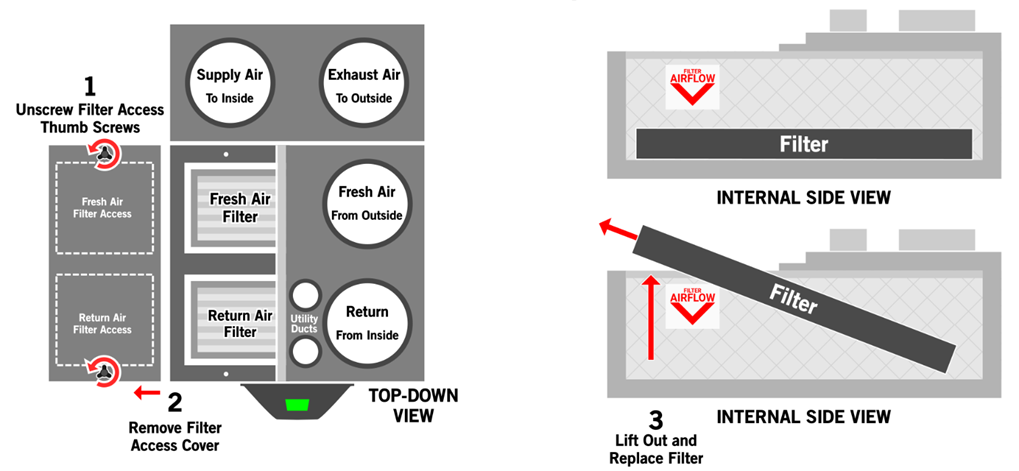
Filter Replacement
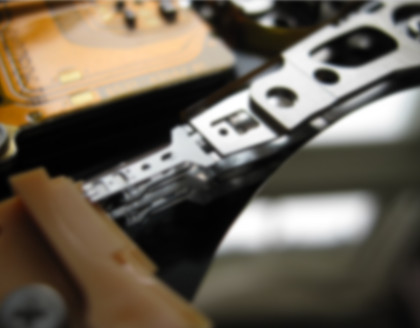
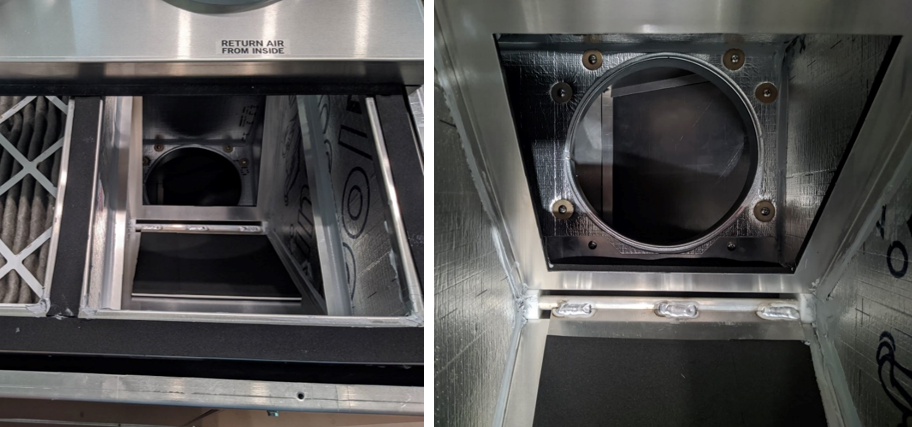
The CERV2 contains filters for both incoming fresh air from outside and return air from inside. The filters can be easily accessed by unscrewing the top two thumb-screws and removing the top filter access cover. When replacing the filters, care should be made not to drop any object into the openings.
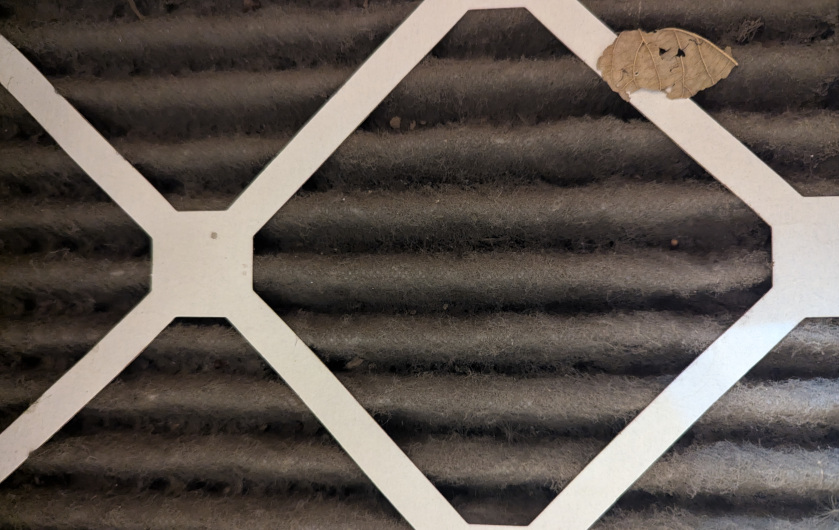
The CERV2 comes standard with two MERV 13, 10”x20”x1” filters. Any 10”x20” filter 1” or 2” thick can be used, although using filters higher than MERV 13 can cause higher fan power for little gain in filtration. Ensure that the filter direction corresponds to the airflow direction sticker on the inside of the CERV (points down). Filters should be replaced at least every 90 days, but indoor and outdoor particulate levels may necessitate more frequent changing. The inside and outside filters may also have different changing schedules. The return air filter may need less frequent changing than the fresh air filter.
Regular filter maintenance is important in keeping the inside air healthy and free from particulates as well as allowing for peak system operating efficiency.
Approximate working time: 10 minutes

Touchscreen Controller – Replacing Filters
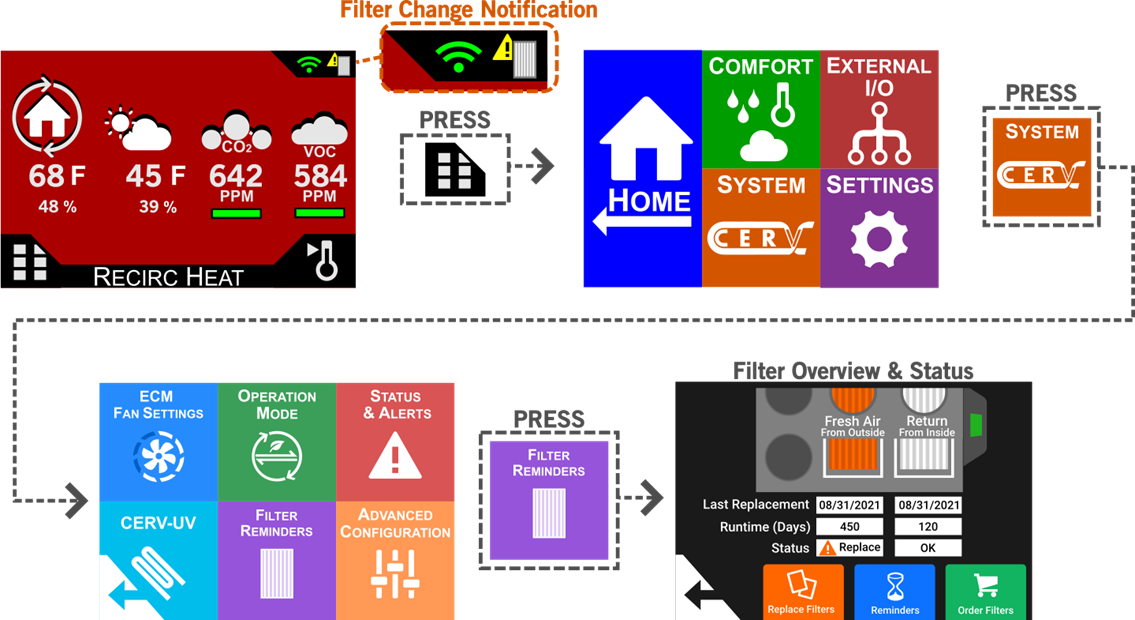


Accessing Filters for Replacement
Filter Email Notifications
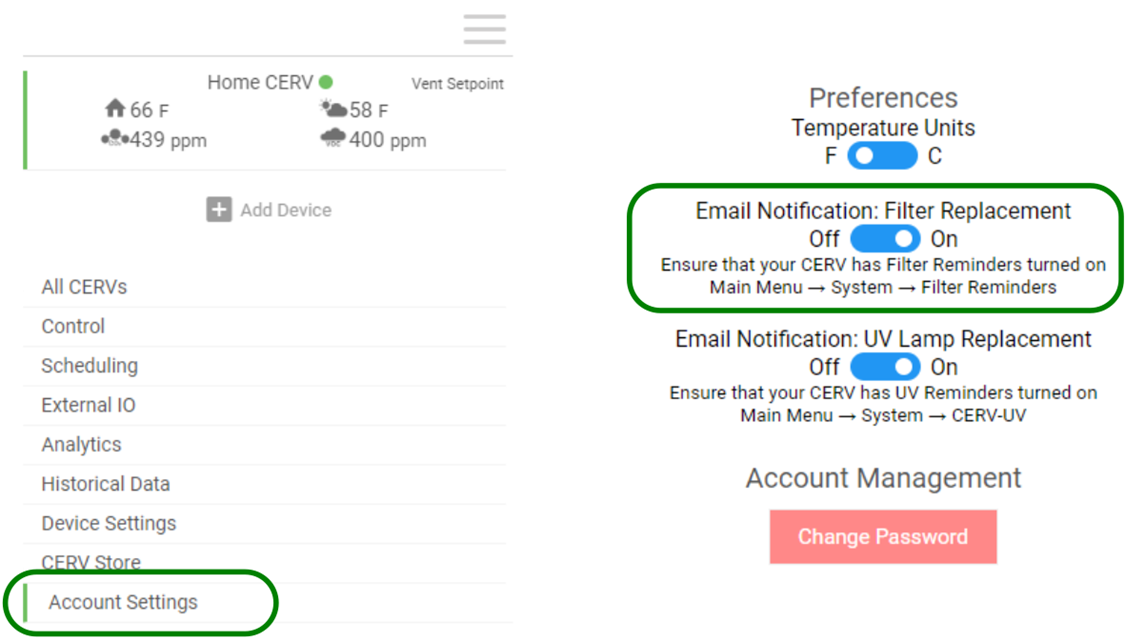
If your CERV is connected online, you can choose to receive a notification when it is time to replace your filter. Through the CERV-ICE app, select Account Settings, then enable Email Notification: Filter Replacement. When the CERV has determined that it is time to replace the filter (interval configured from the touchscreen’s Filter Reminders), the email address associated with the CERV-ICE account will receive an email notification with link to the online store to order replacement filters.
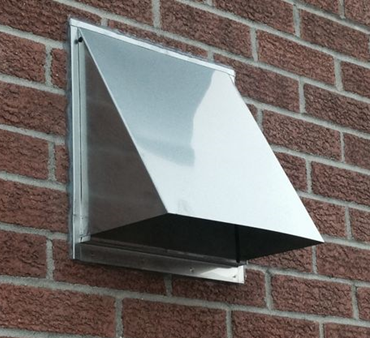
Check / Clean Exterior Vents
Periodically, it is important to check the two exterior vent fixtures (Fresh Air Inlet and Stale Air Exhaust) to ensure that they are free from obstructions such as debris, plant matter, or lint. Wall vents to the outside must use a coarse screen or mesh to prevent insects, birds, etc. from entering, but fine screens, dampers, flaps, etc. should be removed to eliminate any restrictions.
It is recommended to check and clean the exterior vents every time the filters on the system are changed.
Condensate Trap Cleaning
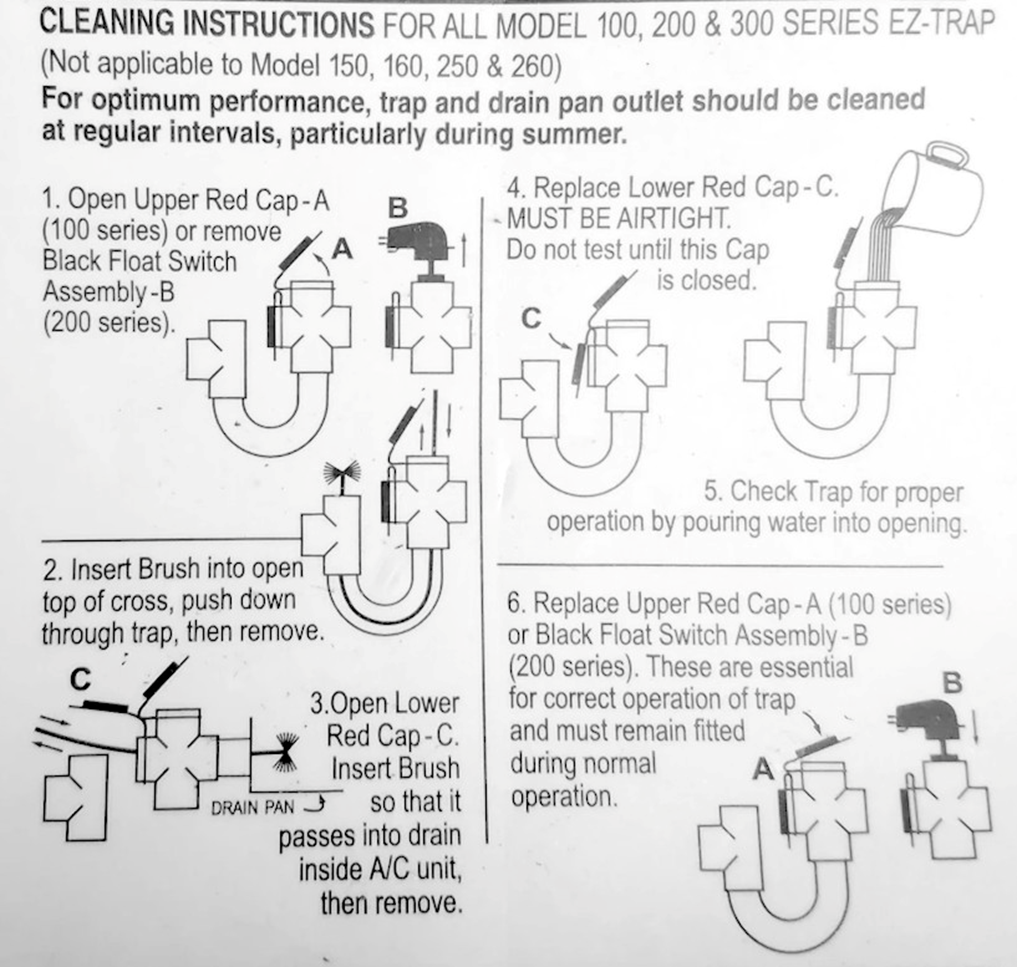
The CERV2 condensate drain should be cleaned as part of a routine maintenance schedule. In some homes, bacterial growth in the condensate drain may produce sludge that blocks water flow, and may cause water overflow from the unit. The CERV2 comes with an EZ-Trap, providing a convenient way to view the condition of the drain, as well as a simple method to clean it. The EZ-Trap kit includes a flexible brush and cleanout ports to allow the trap and connected pipe to be cleaned.
Condensate Drain Cleaning – Tablets
The CERV2 condensate drain should be cleaned as part of a routine maintenance schedule. In some homes, bacterial growth in the condensate drain may produce sludge that blocks water flow, and may cause water overflow from the unit. Air conditioner “Pan Tablets” may be used to dissolve bacterial deposits and renew the drain piping. The CERV2 has two internal condensate drain pans – the season (heating/cooling) will dictate which drain pan to add the tablet to.
Approximate working time: 10 minutes

Cooling Season Condensate Drain Pan
The following instructions describe how to add the pan tablet into the drain pain used when the CERV is actively cooling the home. Instructions for the Heating Season condensate drain pain may be found after this section.
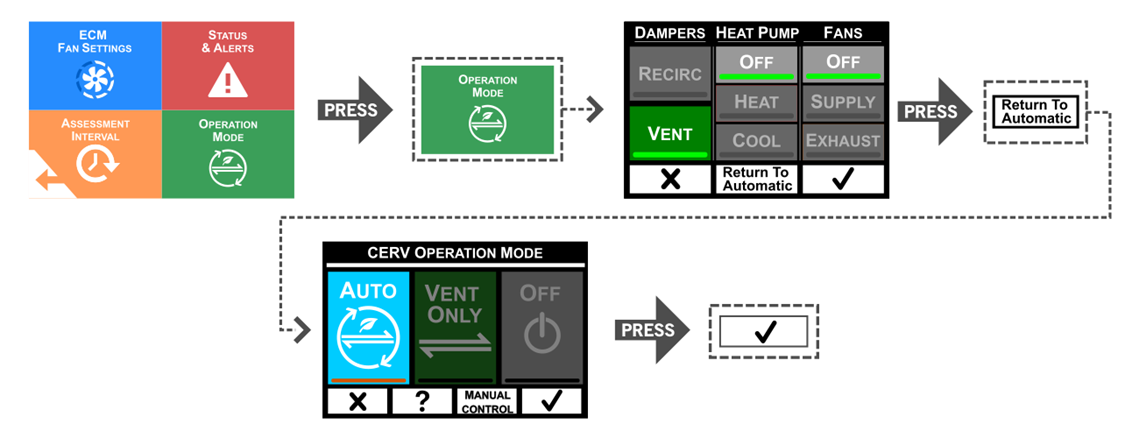
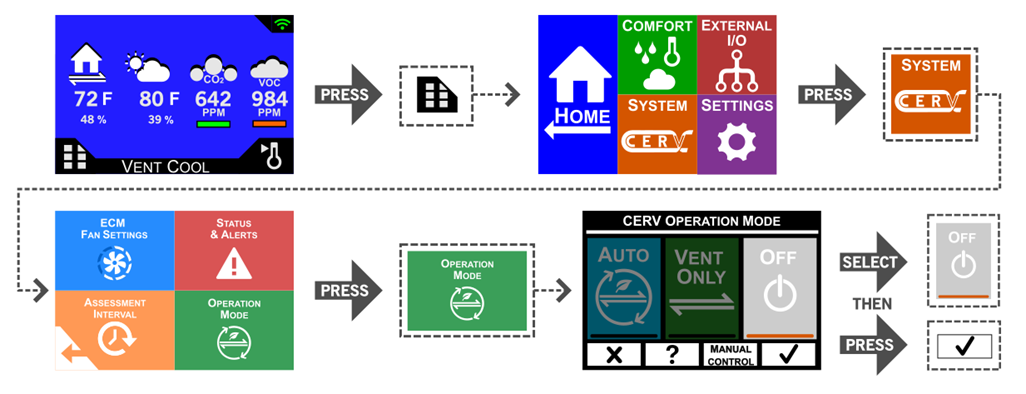
Step 1: Set Operation Mode to OFF
Use the touchscreen controller on the front of the CERV2 to set the CERV2’s operation to “Off”. Navigate with the following screen sequence:
Step 2: Remove Filter Cover

Unscrew the filter access thumb screws on the top of the CERV2, and set the Filter Access Panel aside. Remove the Return Air Filter (closest to the front of the unit), and set aside. Removal of the Fresh Air Filter is not necessary.
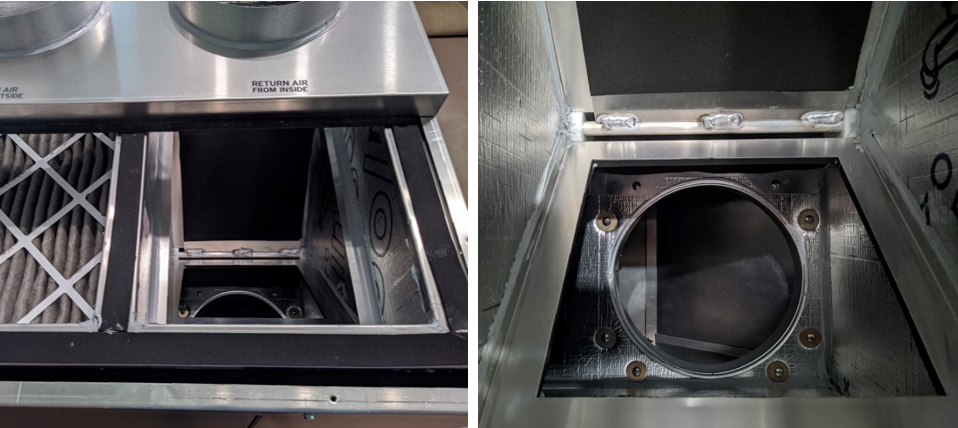
With the filter removed, the round opening to the bottom heat exchanger section is visible.
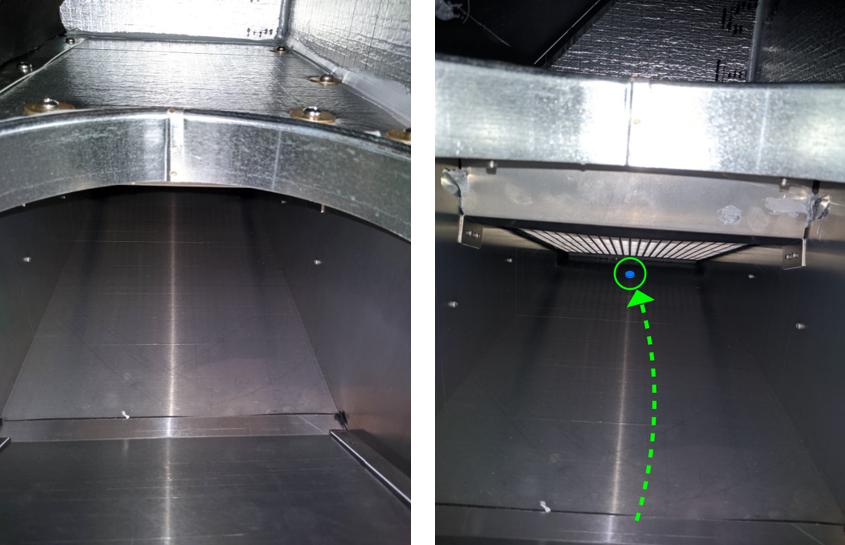
Step 3: Add Condensate Pan Tablet
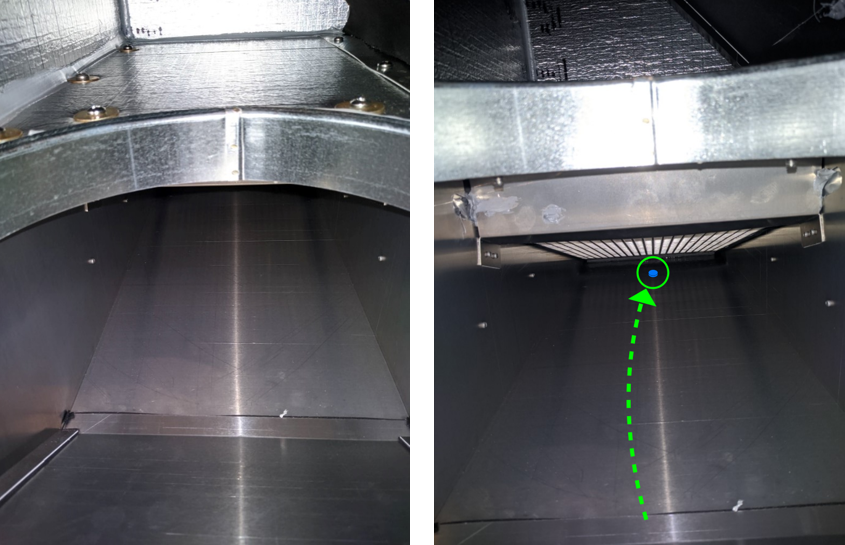
Take one of the tablets, reach your hand down into the round opening, and toss the tablet towards the back of the unit (as far to the back as possible).
Step 4: Add Water
Pour 1 or more cups of water (8oz) through the round opening. The water should run towards the tablet at the back of the unit.
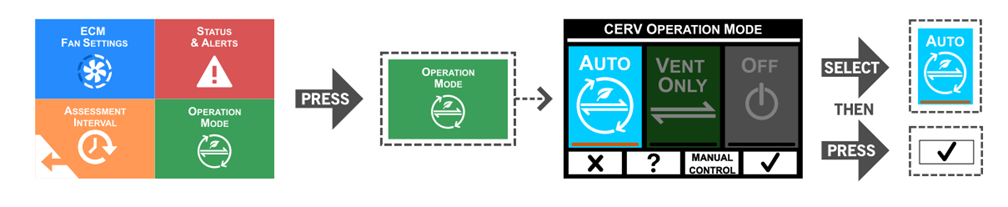
Tablet Addition Complete
Re-insert the CERV’s filter, screw in the filter access panel, then return the CERV to Auto mode.
Heating Season Condensate Drain Pan
The following instructions describe how to add the pan tablet into the drain pain used when the CERV is actively heating the home. Instructions for the Cooling Season condensate drain pain may be found at the beginning of the document.
Step 1: Change Damper Position to Access Drain Pan
In order to access the condensate drain pan for Heating Mode, the inlet damper must be moved out of the way. To achieve this, go to Operation Mode, then click Manual Control. Set the Dampers to Vent, Heat Pump Off, and Fans Off and press the forward arrow. Finally, choose “30 Min”, and press the check box.

Step 2: Remove Filter Cover
Unscrew the filter access thumb screws on the top of the CERV2, and set the Filter Access Panel aside. Remove the Return Air Filter (closest to the front of the unit), and set aside. Removal of the Fresh Air Filter is not necessary.
With the filter removed, the round opening to the bottom heat exchanger section is visible.
Step 3: Add the Tablet
Take one of the tablets, reach your hand down into the round opening, and toss the tablet towards the back of the unit (as far to the back as possible).
Step 4: Add Water
Pour 1 cup of water (8oz) through the round opening. The water should run towards the tablet at the back of the unit.
Tablet Addition Complete
Re-insert the CERV’s filter, screw in the filter access panel, then return the CERV to Auto mode.